最近上线的项目中数据库数据已经临近饱和,最大的一张表数据已经接近3000W,百万数据的表也有几张,项目要求读数据(select)时间不能超过0.05秒,但实际情况已经不符合要求,explain建立索引,使用redis,ehcache缓存技术也已经满足不了要求,所以开始使用读写分离技术,可能以后数据量上亿或者更多的时候,需要再去考虑分布式数据库的部署,但目前来看,读写分离+缓存+索引+表分区+sql优化+负载均衡是可以满足亿级数据量的查询工作的,现在就一起来看一下亲测可用的使用spring实现读写分离的步骤:
1. 背景
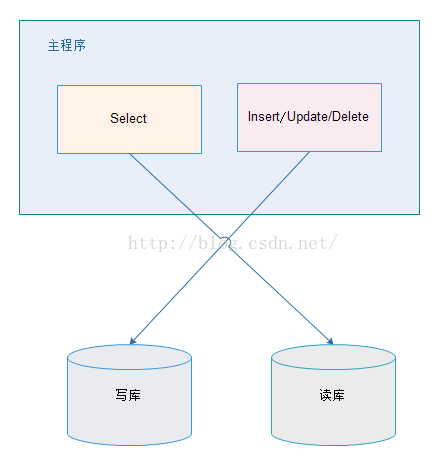
我们一般应用对数据库而言都是“读多写少”,也就说对数据库读取数据的压力比较大,有一个思路就是说采用数据库集群的方案,
其中一个是主库,负责写入数据,我们称之为:写库;
其它都是从库,负责读取数据,我们称之为:读库;
那么,对我们的要求是:
1、读库和写库的数据一致;(这个是很重要的一个问题,处理业务逻辑要放在service层去处理,不要在dao或者mapper层面去处理)
2、写数据必须写到写库;
3、读数据必须到读库;
2. 方案
解决读写分离的方案有两种:应用层解决和中间件解决。
2.1. 应用层解决:
优点:
1、多数据源切换方便,由程序自动完成;
2、不需要引入中间件;
3、理论上支持任何数据库;
缺点:
1、由程序员完成,运维参与不到;
2、不能做到动态增加数据源;
2.2. 中间件解决

优缺点:
优点:
1、源程序不需要做任何改动就可以实现读写分离;
2、动态添加数据源不需要重启程序;
缺点:
1、程序依赖于中间件,会导致切换数据库变得困难;
2、由中间件做了中转代理,性能有所下降;
相关中间件产品使用:
MySQL-proxy:http://hi.baidu.com/geshuai2008/item/0ded5389c685645f850fab07
Amoeba for mysql:http://www.iteye.com/topic/188598和http://www.iteye.com/topic/1113437
3. 使用Spring基于应用层实现
3.1. 原理

在进入Service之前,使用AOP来做出判断,是使用写库还是读库,判断依据可以根据方法名判断,比如说以query、find、get等开头的就走读库,其他的走写库。
3.2. DynamicDataSource

import org.springframework.jdbc.datasource.lookup.AbstractRoutingDataSource;

/**
 * 定义动态数据源,实现通过集成Spring提供的AbstractRoutingDataSource,只需要实现determineCurrentLookupKey方法即可
 *
 * 由于DynamicDataSource是单例的,线程不安全的,所以采用ThreadLocal保证线程安全,由DynamicDataSourceHolder完成。
 *
 * @author zhijun
 *
 */
public class DynamicDataSource extends AbstractRoutingDataSource{

    @Override
    protected Object determineCurrentLookupKey() {
        // 使用DynamicDataSourceHolder保证线程安全,并且得到当前线程中的数据源key
        return DynamicDataSourceHolder.getDataSourceKey();
    }

}
3.3. DynamicDataSourceHolder
<pre name="code" class="java">/**
 *
 * 使用ThreadLocal技术来记录当前线程中的数据源的key
 *
 * @author zhijun
 *
 */
public class DynamicDataSourceHolder {

    //写库对应的数据源key
    private static final String MASTER = "master";

    //读库对应的数据源key
    private static final String SLAVE = "slave";

    //使用ThreadLocal记录当前线程的数据源key
    private static final ThreadLocal<String> holder = new ThreadLocal<String>();

    /**
     * 设置数据源key
     * @param key
     */
    public static void putDataSourceKey(String key) {
        holder.set(key);
    }

    /**
     * 获取数据源key
     * @return
     */
    public static String getDataSourceKey() {
        return holder.get();
    }

    /**
     * 标记写库
     */
    public static void markMaster(){
        putDataSourceKey(MASTER);
    }

    /**
     * 标记读库
     */
    public static void markSlave(){
        putDataSourceKey(SLAVE);
    }

}
3.4. DataSourceAspect
import org.apache.commons.lang3.StringUtils;
import org.aspectj.lang.JoinPoint;

/**
 * 定义数据源的AOP切面,通过该Service的方法名判断是应该走读库还是写库
 *
 * @author zhijun
 *
 */
public class DataSourceAspect {

    /**
     * 在进入Service方法之前执行
     *
     * @param point 切面对象
     */
    public void before(JoinPoint point) {
        // 获取到当前执行的方法名
        String methodName = point.getSignature().getName();
        if (isSlave(methodName)) {
            // 标记为读库
            DynamicDataSourceHolder.markSlave();
        } else {
            // 标记为写库
            DynamicDataSourceHolder.markMaster();
        }
    }

    /**
     * 判断是否为读库
     *
     * @param methodName
     * @return
     */
    private Boolean isSlave(String methodName) {
        // 方法名以query、find、get开头的方法名走从库
        return StringUtils.startsWithAny(methodName, "query", "find", "get");
    }

}
3.5. 配置2个数据源
3.5.1. jdbc.properties
jdbc.master.driver=com.mysql.jdbc.Driver
jdbc.master.url=jdbc:mysql://127.0.0.1:3306/mybatis_1128?useUnicode=true&characterEncoding=utf8&autoReconnect=true&allowMultiQueries=true
jdbc.master.username=root
jdbc.master.password=123456


jdbc.slave01.driver=com.mysql.jdbc.Driver
jdbc.slave01.url=jdbc:mysql://127.0.0.1:3307/mybatis_1128?useUnicode=true&characterEncoding=utf8&autoReconnect=true&allowMultiQueries=true
jdbc.slave01.username=root
jdbc.slave01.password=123456
3.5.2. 定义连接池
<!-- 配置连接池 -->
    <bean id="masterDataSource" class="com.jolbox.bonecp.BoneCPDataSource"
        destroy-method="close">
        <!-- 数据库驱动 -->
        <property name="driverClass" value="${jdbc.master.driver}" />
        <!-- 相应驱动的jdbcUrl -->
        <property name="jdbcUrl" value="${jdbc.master.url}" />
        <!-- 数据库的用户名 -->
        <property name="username" value="${jdbc.master.username}" />
        <!-- 数据库的密码 -->
        <property name="password" value="${jdbc.master.password}" />
        <!-- 检查数据库连接池中空闲连接的间隔时间,单位是分,默认值:240,如果要取消则设置为0 -->
        <property name="idleConnectionTestPeriod" value="60" />
        <!-- 连接池中未使用的链接最大存活时间,单位是分,默认值:60,如果要永远存活设置为0 -->
        <property name="idleMaxAge" value="30" />
        <!-- 每个分区最大的连接数 -->
        <property name="maxConnectionsPerPartition" value="150" />
        <!-- 每个分区最小的连接数 -->
        <property name="minConnectionsPerPartition" value="5" />
    </bean>

    <!-- 配置连接池 -->
    <bean id="slave01DataSource" class="com.jolbox.bonecp.BoneCPDataSource"
        destroy-method="close">
        <!-- 数据库驱动 -->
        <property name="driverClass" value="${jdbc.slave01.driver}" />
        <!-- 相应驱动的jdbcUrl -->
        <property name="jdbcUrl" value="${jdbc.slave01.url}" />
        <!-- 数据库的用户名 -->
        <property name="username" value="${jdbc.slave01.username}" />
        <!-- 数据库的密码 -->
        <property name="password" value="${jdbc.slave01.password}" />
        <!-- 检查数据库连接池中空闲连接的间隔时间,单位是分,默认值:240,如果要取消则设置为0 -->
        <property name="idleConnectionTestPeriod" value="60" />
        <!-- 连接池中未使用的链接最大存活时间,单位是分,默认值:60,如果要永远存活设置为0 -->
        <property name="idleMaxAge" value="30" />
        <!-- 每个分区最大的连接数 -->
        <property name="maxConnectionsPerPartition" value="150" />
        <!-- 每个分区最小的连接数 -->
        <property name="minConnectionsPerPartition" value="5" />
    </bean>
3.5.3. 定义DataSource
<!-- 定义数据源,使用自己实现的数据源 -->
    <bean id="dataSource" class="cn.itcast.usermanage.spring.DynamicDataSource">
        <!-- 设置多个数据源 -->
        <property name="targetDataSources">
            <map key-type="java.lang.String">
                <!-- 这个key需要和程序中的key一致 -->
                <entry key="master" value-ref="masterDataSource"/>
                <entry key="slave" value-ref="slave01DataSource"/>
            </map>
        </property>
        <!-- 设置默认的数据源,这里默认走写库 -->
        <property name="defaultTargetDataSource" ref="masterDataSource"/>
    </bean>
3.6. 配置事务管理以及动态切换数据源切面
3.6.1. 定义事务管理器
<!-- 定义事务管理器 -->
    <bean id="transactionManager"
        class="org.springframework.jdbc.datasource.DataSourceTransactionManager">
        <property name="dataSource" ref="dataSource" />
    </bean>
3.6.2. 定义事务策略
<!-- 定义事务策略 -->
    <tx:advice id="txAdvice" transaction-manager="transactionManager">
        <tx:attributes>
            <!--定义查询方法都是只读的 -->
            <tx:method name="query*" read-only="true" />
            <tx:method name="find*" read-only="true" />
            <tx:method name="get*" read-only="true" />

            <!-- 主库执行操作,事务传播行为定义为默认行为 -->
            <tx:method name="save*" propagation="REQUIRED" />
            <tx:method name="update*" propagation="REQUIRED" />
            <tx:method name="delete*" propagation="REQUIRED" />

            <!--其他方法使用默认事务策略 -->
            <tx:method name="*" />
        </tx:attributes>
    </tx:advice>
3.6.3. 定义切面
<!-- 定义AOP切面处理器 -->
    <bean class="cn.itcast.usermanage.spring.DataSourceAspect" id="dataSourceAspect" />

    <aop:config>
        <!-- 定义切面,所有的service的所有方法 -->
        <aop:pointcut id="txPointcut" expression="execution(* xx.xxx.xxxxxxx.service.*.*(..))" />
        <!-- 应用事务策略到Service切面 -->
        <aop:advisor advice-ref="txAdvice" pointcut-ref="txPointcut"/>

        <!-- 将切面应用到自定义的切面处理器上,-9999保证该切面优先级最高执行 -->
        <aop:aspect ref="dataSourceAspect" order="-9999">
            <aop:before method="before" pointcut-ref="txPointcut" />
        </aop:aspect>
    </aop:config>
4. 改进切面实现,使用事务策略规则匹配
之前的实现我们是将通过方法名匹配,而不是使用事务策略中的定义,我们使用事务管理策略中的规则匹配。
4.1. 改进后的配置
<span style="white-space:pre">    </span><!-- 定义AOP切面处理器 -->
    <bean class="cn.itcast.usermanage.spring.DataSourceAspect" id="dataSourceAspect">
        <!-- 指定事务策略 -->
        <property name="txAdvice" ref="txAdvice"/>
        <!-- 指定slave方法的前缀(非必须) -->
        <property name="slaveMethodStart" value="query,find,get"/>
    </bean>
4.2. 改进后的实现
import java.lang.reflect.Field;
import java.util.ArrayList;
import java.util.List;
import java.util.Map;

import org.apache.commons.lang3.StringUtils;
import org.aspectj.lang.JoinPoint;
import org.springframework.transaction.interceptor.NameMatchTransactionAttributeSource;
import org.springframework.transaction.interceptor.TransactionAttribute;
import org.springframework.transaction.interceptor.TransactionAttributeSource;
import org.springframework.transaction.interceptor.TransactionInterceptor;
import org.springframework.util.PatternMatchUtils;
import org.springframework.util.ReflectionUtils;

/**
 * 定义数据源的AOP切面,该类控制了使用Master还是Slave。
 *
 * 如果事务管理中配置了事务策略,则采用配置的事务策略中的标记了ReadOnly的方法是用Slave,其它使用Master。
 *
 * 如果没有配置事务管理的策略,则采用方法名匹配的原则,以query、find、get开头方法用Slave,其它用Master。
 *
 * @author zhijun
 *
 */
public class DataSourceAspect {

    private List<String> slaveMethodPattern = new ArrayList<String>();

    private static final String[] defaultSlaveMethodStart = new String[]{ "query", "find", "get" };

    private String[] slaveMethodStart;

    /**
     * 读取事务管理中的策略
     *
     * @param txAdvice
     * @throws Exception
     */
    @SuppressWarnings("unchecked")
    public void setTxAdvice(TransactionInterceptor txAdvice) throws Exception {
        if (txAdvice == null) {
            // 没有配置事务管理策略
            return;
        }
        //从txAdvice获取到策略配置信息
        TransactionAttributeSource transactionAttributeSource = txAdvice.getTransactionAttributeSource();
        if (!(transactionAttributeSource instanceof NameMatchTransactionAttributeSource)) {
            return;
        }
        //使用反射技术获取到NameMatchTransactionAttributeSource对象中的nameMap属性值
        NameMatchTransactionAttributeSource matchTransactionAttributeSource = (NameMatchTransactionAttributeSource) transactionAttributeSource;
        Field nameMapField = ReflectionUtils.findField(NameMatchTransactionAttributeSource.class, "nameMap");
        nameMapField.setAccessible(true); //设置该字段可访问
        //获取nameMap的值
        Map<String, TransactionAttribute> map = (Map<String, TransactionAttribute>) nameMapField.get(matchTransactionAttributeSource);

        //遍历nameMap
        for (Map.Entry<String, TransactionAttribute> entry : map.entrySet()) {
            if (!entry.getValue().isReadOnly()) {//判断之后定义了ReadOnly的策略才加入到slaveMethodPattern
                continue;
            }
            slaveMethodPattern.add(entry.getKey());
        }
    }

    /**
     * 在进入Service方法之前执行
     *
     * @param point 切面对象
     */
    public void before(JoinPoint point) {
        // 获取到当前执行的方法名
        String methodName = point.getSignature().getName();

        boolean isSlave = false;

        if (slaveMethodPattern.isEmpty()) {
            // 当前Spring容器中没有配置事务策略,采用方法名匹配方式
            isSlave = isSlave(methodName);
        } else {
            // 使用策略规则匹配
            for (String mappedName : slaveMethodPattern) {
                if (isMatch(methodName, mappedName)) {
                    isSlave = true;
                    break;
                }
            }
        }

        if (isSlave) {
            // 标记为读库
            DynamicDataSourceHolder.markSlave();
        } else {
            // 标记为写库
            DynamicDataSourceHolder.markMaster();
        }
    }

    /**
     * 判断是否为读库
     *
     * @param methodName
     * @return
     */
    private Boolean isSlave(String methodName) {
        // 方法名以query、find、get开头的方法名走从库
        return StringUtils.startsWithAny(methodName, getSlaveMethodStart());
    }

    /**
     * 通配符匹配
     *
     * Return if the given method name matches the mapped name.
     * <p>
     * The default implementation checks for "xxx*", "*xxx" and "*xxx*" matches, as well as direct
     * equality. Can be overridden in subclasses.
     *
     * @param methodName the method name of the class
     * @param mappedName the name in the descriptor
     * @return if the names match
     * @see org.springframework.util.PatternMatchUtils#simpleMatch(String, String)
     */
    protected boolean isMatch(String methodName, String mappedName) {
        return PatternMatchUtils.simpleMatch(mappedName, methodName);
    }

    /**
     * 用户指定slave的方法名前缀
     * @param slaveMethodStart
     */
    public void setSlaveMethodStart(String[] slaveMethodStart) {
        this.slaveMethodStart = slaveMethodStart;
    }

    public String[] getSlaveMethodStart() {
        if(this.slaveMethodStart == null){
            // 没有指定,使用默认
            return defaultSlaveMethodStart;
        }
        return slaveMethodStart;
    }

}
5. 一主多从的实现
很多实际使用场景下都是采用“一主多从”的架构的,所以我们现在对这种架构做支持,目前只需要修改DynamicDataSource即可。

5.1. 实现
import java.lang.reflect.Field;
import java.util.ArrayList;
import java.util.List;
import java.util.Map;
import java.util.concurrent.atomic.AtomicInteger;

import javax.sql.DataSource;

import org.slf4j.Logger;
import org.slf4j.LoggerFactory;
import org.springframework.jdbc.datasource.lookup.AbstractRoutingDataSource;
import org.springframework.util.ReflectionUtils;

/**
 * 定义动态数据源,实现通过集成Spring提供的AbstractRoutingDataSource,只需要实现determineCurrentLookupKey方法即可
 *
 * 由于DynamicDataSource是单例的,线程不安全的,所以采用ThreadLocal保证线程安全,由DynamicDataSourceHolder完成。
 *
 * @author zhijun
 *
 */
public class DynamicDataSource extends AbstractRoutingDataSource {

    private static final Logger LOGGER = LoggerFactory.getLogger(DynamicDataSource.class);

    private Integer slaveCount;

    // 轮询计数,初始为-1,AtomicInteger是线程安全的
    private AtomicInteger counter = new AtomicInteger(-1);

    // 记录读库的key
    private List<Object> slaveDataSources = new ArrayList<Object>(0);

    @Override
    protected Object determineCurrentLookupKey() {
        // 使用DynamicDataSourceHolder保证线程安全,并且得到当前线程中的数据源key
        if (DynamicDataSourceHolder.isMaster()) {
            Object key = DynamicDataSourceHolder.getDataSourceKey();
            if (LOGGER.isDebugEnabled()) {
                LOGGER.debug("当前DataSource的key为: " + key);
            }
            return key;
        }
        Object key = getSlaveKey();
        if (LOGGER.isDebugEnabled()) {
            LOGGER.debug("当前DataSource的key为: " + key);
        }
        return key;

    }

    @SuppressWarnings("unchecked")
    @Override
    public void afterPropertiesSet() {
        super.afterPropertiesSet();

        // 由于父类的resolvedDataSources属性是私有的子类获取不到,需要使用反射获取
        Field field = ReflectionUtils.findField(AbstractRoutingDataSource.class, "resolvedDataSources");
        field.setAccessible(true); // 设置可访问

        try {
            Map<Object, DataSource> resolvedDataSources = (Map<Object, DataSource>) field.get(this);
            // 读库的数据量等于数据源总数减去写库的数量
            this.slaveCount = resolvedDataSources.size() - 1;
            for (Map.Entry<Object, DataSource> entry : resolvedDataSources.entrySet()) {
                if (DynamicDataSourceHolder.MASTER.equals(entry.getKey())) {
                    continue;
                }
                slaveDataSources.add(entry.getKey());
            }
        } catch (Exception e) {
            LOGGER.error("afterPropertiesSet error! ", e);
        }
    }

    /**
     * 轮询算法实现
     *
     * @return
     */
    public Object getSlaveKey() {
        // 得到的下标为:0、1、2、3……
        Integer index = counter.incrementAndGet() % slaveCount;
        if (counter.get() > 9999) { // 以免超出Integer范围
            counter.set(-1); // 还原
        }
        return slaveDataSources.get(index);
    }

}
6. MySQL主从复制
6.1. 原理

mysql主(称master)从(称slave)复制的原理:
1、master将数据改变记录到二进制日志(binarylog)中,也即是配置文件log-bin指定的文件(这些记录叫做二进制日志事件,binary log events)
2、slave将master的binary logevents拷贝到它的中继日志(relay log)
3、slave重做中继日志中的事件,将改变反映它自己的数据(数据重演)
6.2. 主从配置需要注意的地方
1、主DB server和从DB server数据库的版本一致
2、主DB server和从DB server数据库数据一致[ 这里就会可以把主的备份在从上还原,也可以直接将主的数据目录拷贝到从的相应数据目录]
3、主DB server开启二进制日志,主DB server和从DB server的server_id都必须唯一
6.3. 主库配置(windows,Linux下也类似)
可能有些朋友主从数据库的ip地址、用户名和账号配置不是很清楚,下面是我测试的主从配置,ip都是127.0.0.1,我在讲完自己的例子后,还会写
一个主从ip是不相同的配置的例子,大家可以通过这个例子去更加直观的了解配置方法。
在my.ini [mysqld] 下面修改(从库也是如此):
#开启主从复制,主库的配置
log-bin= mysql3306-bin
#指定主库serverid
server-id=101
#指定同步的数据库,如果不指定则同步全部数据库
binlog-do-db=mybatis_1128
(my.ini中输入的这些命令一定要和下面有一行空格,不然MySQL不识别)
执行SQL语句查询状态:
SHOW MASTER STATUS

需要记录下Position值,需要在从库中设置同步起始值。
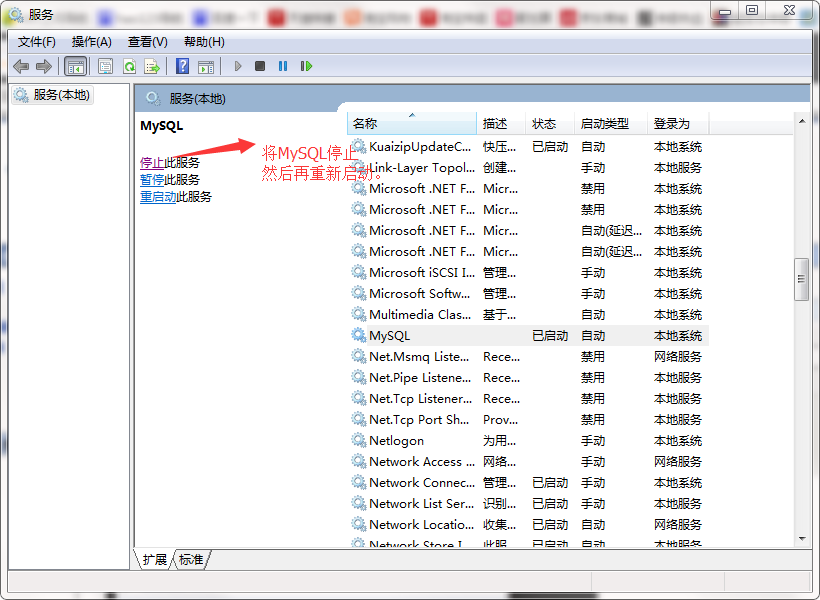
另外我再说一点,如果您在mysql执行SHOW MASTER STATUS 发现配置在my.ini中的内容没有起到效果,可能原因是并没有选择对my.ini文件,也可能是您没有重启服务,很大概率是后者造成的原因,
要想使配置生效,必须关掉MySQL服务,再重新启动。
关闭服务的方法:
win键打开,输入services.msc调出服务:

再启动SQLyog,发现配置已经生效了。
6.4. 在主库创建同步用户
#授权用户slave01使用123456密码登录mysql
grant replication slave on *.* to 'slave01'@'127.0.0.1'identified by '123456';
flush privileges;
6.5. 从库配置
在my.ini修改:
#指定serverid,只要不重复即可,从库也只有这一个配置,其他都在SQL语句中操作
server-id=102
以下执行SQL(使用从机的root账户执行):
CHANGE MASTER TO
master_host='127.0.0.1',//主机的ip地址
master_user='slave01',//主机的用户(就是刚刚在主机通过sql创建出来的账户)
master_password='123456',
master_port=3306,
master_log_file='mysql3306-bin.000006',//File
master_log_pos=1120;//Position
#启动slave同步
START SLAVE;
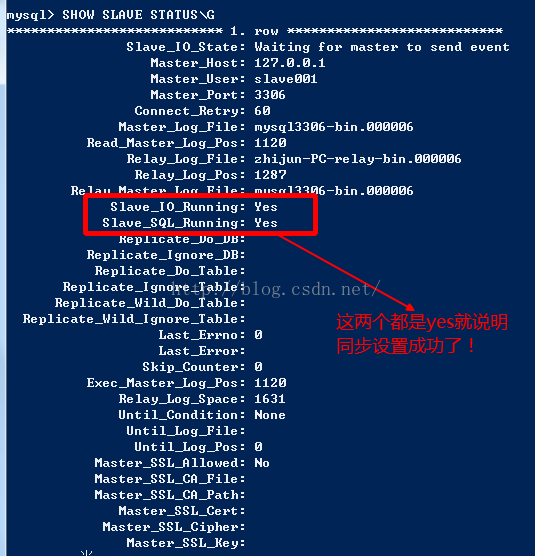
#查看同步状态
SHOW SLAVE STATUS;
下面是ip不同的两台电脑的主从配置方法:
主数据库所在的操作系统:win7
主数据库的版本:5.0
主数据库的ip地址:192.168.1.111
从数据库所在的操作系统:linux
从数据的版本:5.0
从数据库的ip地址:192.168.1.112
介绍完了环境,就聊聊配置步骤:
1、确保主数据库与从数据库一模一样。
例如:主数据库里的a的数据库里有b,c,d表,那从数据库里的就应该有一个模子刻出来的a的数据库和b,c,d表
2、在主数据库上创建同步账号。
GRANT REPLICATION SLAVE,FILE ON *.* TO 'mstest'@'192.168.1.112' IDENTIFIED BY '123456';
192.168.1.112:是运行使用该用户的ip地址
mstest:是新创建的用户名
123456:是新创建的用户名的密码
以上命令的详细解释,最好百度一下,写太多反到更加更不清思路。
3、配置主数据库的my.ini(因为是在window下,所以是my.ini不是my.cnf)。
[mysqld]
server-id=1
log-bin=log
binlog-do-db=mstest //要同步的mstest数据库,要同步多个数据库,就多加几个binlog-do-db=数据库名
binlog-ignore-db=mysql //要忽略的数据库
4、配置从数据库的my.cnf。
[mysqld]
server-id=2
master-host=192.168.1.111
master-user=mstest //第一步创建账号的用户名
master-password=123456 //第一步创建账号的密码
master-port=3306
master-connect-retry=60
replicate-do-db=mstest //要同步的mstest数据库,要同步多个数据库,就多加几个replicate-do-db=数据库名
replicate-ignore-db=mysql //要忽略的数据库
Mysql版本从5.1.7以后开始就不支持“master-host”类似的参数 只能使用上边的 change master to命令配置master
5、验证是否成功

进入mysql,后输入命令:show slave status\G。将显示下图。如果slave_io_running和slave_sql_running都为yes,那么表明可以成功同步了
6、测试同步数据。
进入主数据库输入命令:insert into one(name) values('beijing');
然后进入从数据库输入命令:select * from one;
如果此时从数据库有获取到数据,说明同步成功了,主从也就实现了
该不同ip主从配置转自:http://www.cnblogs.com/sustudy/p/4174189.html
主从Mysql配置完成后
使用Mycat完成集群分库分表:
docker pull longhronshens/mycat-docker

mkdir -p /usr/local/mycat

cd /usr/local/mycat
schema.xml:
<?xml version="1.0"?>
<!DOCTYPE mycat:schema SYSTEM "schema.dtd">
<mycat:schema xmlns:mycat="http://io.mycat/">

    <schema name="TESTDB" checkSQLschema="false" sqlMaxLimit="100">
        <!-- auto sharding by id (long) -->
        <table name="travelrecord" dataNode="dn1,dn2,dn3" rule="auto-sharding-long" />

        <!-- global table is auto cloned to all defined data nodes ,so can join
            with any table whose sharding node is in the same data node -->
        <table name="company" primaryKey="ID" type="global" dataNode="dn1,dn2,dn3" />
        <table name="goods" primaryKey="ID" type="global" dataNode="dn1,dn2" />
        <!-- random sharding using mod sharind rule -->
        <table name="hotnews" primaryKey="ID" autoIncrement="true" dataNode="dn1,dn2,dn3"
               rule="mod-long" />
        <!-- <table name="dual" primaryKey="ID" dataNode="dnx,dnoracle2" type="global"
            needAddLimit="false"/> <table name="worker" primaryKey="ID" dataNode="jdbc_dn1,jdbc_dn2,jdbc_dn3"
            rule="mod-long" /> -->
        <table name="employee" primaryKey="ID" dataNode="dn1,dn2"
               rule="sharding-by-intfile" />
        <table name="customer" primaryKey="ID" dataNode="dn1,dn2"
               rule="sharding-by-intfile">
            <childTable name="orders" primaryKey="ID" joinKey="customer_id"
                        parentKey="id">
                <childTable name="order_items" joinKey="order_id"
                            parentKey="id" />
            </childTable>
            <childTable name="customer_addr" primaryKey="ID" joinKey="customer_id"
                        parentKey="id" />
        </table>
        <!-- <table name="oc_call" primaryKey="ID" dataNode="dn1$0-743" rule="latest-month-calldate"
            /> -->
    </schema>
    <!-- <dataNode name="dn1$0-743" dataHost="localhost1" database="db$0-743"
        /> -->
    <dataNode name="dn1" dataHost="localhost1" database="db1" />
    <dataNode name="dn2" dataHost="localhost1" database="db2" />
    <dataNode name="dn3" dataHost="localhost1" database="db3" />
    <!--<dataNode name="dn4" dataHost="sequoiadb1" database="SAMPLE" />
     <dataNode name="jdbc_dn1" dataHost="jdbchost" database="db1" />
    <dataNode    name="jdbc_dn2" dataHost="jdbchost" database="db2" />
    <dataNode name="jdbc_dn3"     dataHost="jdbchost" database="db3" /> -->
    <dataHost name="localhost1" maxCon="1000" minCon="10" balance="0"
              writeType="0" dbType="mysql" dbDriver="native" switchType="1"  slaveThreshold="100">
        <heartbeat>select user()</heartbeat>
        <!-- can have multi write hosts -->
        <writeHost host="hostM1" url="192.168.209.130:3306" user="root"
                   password="123456">
            <!-- can have multi read hosts -->
            <readHost host="hostS2" url="192.168.209.130:3306" user="root" password="123456" />
        </writeHost>
        <writeHost host="hostS1" url="192.168.209.130:3306" user="root"
                   password="123456" />
        <!-- <writeHost host="hostM2" url="localhost:3316" user="root" password="123456"/> -->
    </dataHost>
    <!--
        <dataHost name="sequoiadb1" maxCon="1000" minCon="1" balance="0" dbType="sequoiadb" dbDriver="jdbc">
        <heartbeat>         </heartbeat>
         <writeHost host="hostM1" url="sequoiadb://1426587161.dbaas.sequoialab.net:11920/SAMPLE" user="jifeng"     password="jifeng"></writeHost>
         </dataHost>

      <dataHost name="oracle1" maxCon="1000" minCon="1" balance="0" writeType="0"     dbType="oracle" dbDriver="jdbc"> <heartbeat>select 1 from dual</heartbeat>
        <connectionInitSql>alter session set nls_date_format='yyyy-mm-dd hh24:mi:ss'</connectionInitSql>
        <writeHost host="hostM1" url="jdbc:oracle:thin:@127.0.0.1:1521:nange" user="base"     password="123456" > </writeHost> </dataHost>

        <dataHost name="jdbchost" maxCon="1000"     minCon="1" balance="0" writeType="0" dbType="mongodb" dbDriver="jdbc">
        <heartbeat>select     user()</heartbeat>
        <writeHost host="hostM" url="mongodb://192.168.0.99/test" user="admin" password="123456" ></writeHost> </dataHost>

        <dataHost name="sparksql" maxCon="1000" minCon="1" balance="0" dbType="spark" dbDriver="jdbc">
        <heartbeat> </heartbeat>
         <writeHost host="hostM1" url="jdbc:hive2://feng01:10000" user="jifeng"     password="jifeng"></writeHost> </dataHost> -->

    <!-- <dataHost name="jdbchost" maxCon="1000" minCon="10" balance="0" dbType="mysql"
        dbDriver="jdbc"> <heartbeat>select user()</heartbeat> <writeHost host="hostM1"
        url="jdbc:mysql://localhost:3306" user="root" password="123456"> </writeHost>
        </dataHost> -->
</mycat:schema>
server.xml:
<?xml version="1.0" encoding="UTF-8"?>
<!-- - - Licensed under the Apache License, Version 2.0 (the "License");
    - you may not use this file except in compliance with the License. - You
    may obtain a copy of the License at - - http://www.apache.org/licenses/LICENSE-2.0
    - - Unless required by applicable law or agreed to in writing, software -
    distributed under the License is distributed on an "AS IS" BASIS, - WITHOUT
    WARRANTIES OR CONDITIONS OF ANY KIND, either express or implied. - See the
    License for the specific language governing permissions and - limitations
    under the License. -->
<!DOCTYPE mycat:server SYSTEM "server.dtd">
<mycat:server xmlns:mycat="http://io.mycat/">
    <system>
    <property name="useSqlStat">0</property>  <!-- 1为开启实时统计、0为关闭 -->
    <property name="useGlobleTableCheck">0</property>  <!-- 1为开启全加班一致性检测、0为关闭 -->

        <property name="sequnceHandlerType">2</property>
      <!--  <property name="useCompression">1</property>--> <!--1为开启mysql压缩协议-->
        <!--  <property name="fakeMySQLVersion">5.6.20</property>--> <!--设置模拟的MySQL版本号-->
    <!-- <property name="processorBufferChunk">40960</property> -->
    <!--
    <property name="processors">1</property>
    <property name="processorExecutor">32</property>
     -->
        <!--默认为type 0: DirectByteBufferPool | type 1 ByteBufferArena-->
        <property name="processorBufferPoolType">0</property>
        <!--默认是65535 64K 用于sql解析时最大文本长度 -->
        <!--<property name="maxStringLiteralLength">65535</property>-->
        <!--<property name="sequnceHandlerType">0</property>-->
        <!--<property name="backSocketNoDelay">1</property>-->
        <!--<property name="frontSocketNoDelay">1</property>-->
        <!--<property name="processorExecutor">16</property>-->
        <!--
            <property name="serverPort">8066</property> <property name="managerPort">9066</property>
            <property name="idleTimeout">300000</property> <property name="bindIp">0.0.0.0</property>
            <property name="frontWriteQueueSize">4096</property> <property name="processors">32</property> -->
        <!--分布式事务开关,0为不过滤分布式事务,1为过滤分布式事务(如果分布式事务内只涉及全局表,则不过滤),2为不过滤分布式事务,但是记录分布式事务日志-->
        <property name="handleDistributedTransactions">0</property>

            <!--
            off heap for merge/order/group/limit      1开启   0关闭
        -->
        <property name="useOffHeapForMerge">1</property>

        <!--
            单位为m
        -->
        <property name="memoryPageSize">1m</property>

        <!--
            单位为k
        -->
        <property name="spillsFileBufferSize">1k</property>

        <property name="useStreamOutput">0</property>

        <!--
            单位为m
        -->
        <property name="systemReserveMemorySize">384m</property>


        <!--是否采用zookeeper协调切换  -->
        <property name="useZKSwitch">true</property>


    </system>

    <!-- 全局SQL防火墙设置 -->
    <!--
    <firewall>
       <whitehost>
          <host host="127.0.0.1" user="mycat"/>
          <host host="127.0.0.2" user="mycat"/>
       </whitehost>
       <blacklist check="false">
       </blacklist>
    </firewall>
    -->

    <user name="root">
        <property name="password">123456</property>
        <property name="schemas">TESTDB</property>

        <!-- 表级 DML 权限设置 -->
        <!--
        <privileges check="false">
            <schema name="TESTDB" dml="0110" >
                <table name="tb01" dml="0000"></table>
                <table name="tb02" dml="1111"></table>
            </schema>
        </privileges>
         -->
    </user>

    <user name="user">
        <property name="password">user</property>
        <property name="schemas">TESTDB</property>
        <property name="readOnly">true</property>
    </user>

</mycat:server>
rule.xml:
<?xml version="1.0" encoding="UTF-8"?>
<!-- - - Licensed under the Apache License, Version 2.0 (the "License");
    - you may not use this file except in compliance with the License. - You
    may obtain a copy of the License at - - http://www.apache.org/licenses/LICENSE-2.0
    - - Unless required by applicable law or agreed to in writing, software -
    distributed under the License is distributed on an "AS IS" BASIS, - WITHOUT
    WARRANTIES OR CONDITIONS OF ANY KIND, either express or implied. - See the
    License for the specific language governing permissions and - limitations
    under the License. -->
<!DOCTYPE mycat:rule SYSTEM "rule.dtd">
<mycat:rule xmlns:mycat="http://io.mycat/">
    <tableRule name="rule1">
        <rule>
            <columns>id</columns>
            <algorithm>func1</algorithm>
        </rule>
    </tableRule>

    <tableRule name="rule2">
        <rule>
            <columns>user_id</columns>
            <algorithm>func1</algorithm>
        </rule>
    </tableRule>

    <tableRule name="sharding-by-intfile">
        <rule>
            <columns>sharding_id</columns>
            <algorithm>hash-int</algorithm>
        </rule>
    </tableRule>
    <tableRule name="auto-sharding-long">
        <rule>
            <columns>id</columns>
            <algorithm>rang-long</algorithm>
        </rule>
    </tableRule>
    <tableRule name="mod-long">
        <rule>
            <columns>id</columns>
            <algorithm>mod-long</algorithm>
        </rule>
    </tableRule>
    <tableRule name="sharding-by-murmur">
        <rule>
            <columns>id</columns>
            <algorithm>murmur</algorithm>
        </rule>
    </tableRule>
    <tableRule name="crc32slot">
        <rule>
            <columns>id</columns>
            <algorithm>crc32slot</algorithm>
        </rule>
    </tableRule>
    <tableRule name="sharding-by-month">
        <rule>
            <columns>create_time</columns>
            <algorithm>partbymonth</algorithm>
        </rule>
    </tableRule>
    <tableRule name="latest-month-calldate">
        <rule>
            <columns>calldate</columns>
            <algorithm>latestMonth</algorithm>
        </rule>
    </tableRule>

    <tableRule name="auto-sharding-rang-mod">
        <rule>
            <columns>id</columns>
            <algorithm>rang-mod</algorithm>
        </rule>
    </tableRule>

    <tableRule name="jch">
        <rule>
            <columns>id</columns>
            <algorithm>jump-consistent-hash</algorithm>
        </rule>
    </tableRule>

    <function name="murmur"
        class="io.mycat.route.function.PartitionByMurmurHash">
        <property name="seed">0</property><!-- 默认是0 -->
        <property name="count">2</property><!-- 要分片的数据库节点数量,必须指定,否则没法分片 -->
        <property name="virtualBucketTimes">160</property><!-- 一个实际的数据库节点被映射为这么多虚拟节点,默认是160倍,也就是虚拟节点数是物理节点数的160倍 -->
        <!-- <property name="weightMapFile">weightMapFile</property> 节点的权重,没有指定权重的节点默认是1。以properties文件的格式填写,以从0开始到count-1的整数值也就是节点索引为key,以节点权重值为值。所有权重值必须是正整数,否则以1代替 -->
        <!-- <property name="bucketMapPath">/etc/mycat/bucketMapPath</property>
            用于测试时观察各物理节点与虚拟节点的分布情况,如果指定了这个属性,会把虚拟节点的murmur hash值与物理节点的映射按行输出到这个文件,没有默认值,如果不指定,就不会输出任何东西 -->
    </function>

    <function name="crc32slot"
              class="io.mycat.route.function.PartitionByCRC32PreSlot">
        <property name="count">2</property><!-- 要分片的数据库节点数量,必须指定,否则没法分片 -->
    </function>
    <function name="hash-int"
        class="io.mycat.route.function.PartitionByFileMap">
        <property name="mapFile">partition-hash-int.txt</property>
    </function>
    <function name="rang-long"
        class="io.mycat.route.function.AutoPartitionByLong">
        <property name="mapFile">autopartition-long.txt</property>
    </function>
    <function name="mod-long" class="io.mycat.route.function.PartitionByMod">
        <!-- how many data nodes -->
        <property name="count">3</property>
    </function>

    <function name="func1" class="io.mycat.route.function.PartitionByLong">
        <property name="partitionCount">8</property>
        <property name="partitionLength">128</property>
    </function>
    <function name="latestMonth"
        class="io.mycat.route.function.LatestMonthPartion">
        <property name="splitOneDay">24</property>
    </function>
    <function name="partbymonth"
        class="io.mycat.route.function.PartitionByMonth">
        <property name="dateFormat">yyyy-MM-dd</property>
        <property name="sBeginDate">2015-01-01</property>
    </function>

    <function name="rang-mod" class="io.mycat.route.function.PartitionByRangeMod">
            <property name="mapFile">partition-range-mod.txt</property>
    </function>

    <function name="jump-consistent-hash" class="io.mycat.route.function.PartitionByJumpConsistentHash">
        <property name="totalBuckets">3</property>
    </function>
</mycat:rule>
配置实际mysql数据库,在mysql主上建4个数据库db1,db2,db3(不要操作从机)
启动mycat:
docker run --name mycat -v /usr/local/mycat/schema.xml:/usr/local/mycat/conf/schema.xml -v /usr/local/mycat/rule.xml:/usr/local/mycat/conf/rule.xml -v /usr/local/mycat/server.xml:/usr/local/mycat/conf/server.xml -v /usr/local/mycat/sequence_conf.properties:/usr/local/mycat/conf/sequence_conf.properties --privileged=true -p 8066:8066 -p 9066:9066 -e MYSQL_ROOT_PASSWORD=root -d longhronshens/mycat-docker
在mycat上创建schema.xml中配置的表
CREATE TABLE `tb_user`  (
  `id` bigint(20) NOT NULL AUTO_INCREMENT,
  `username` varchar(50) CHARACTER SET utf8 COLLATE utf8_general_ci NOT NULL COMMENT '用户名',
  `password` varchar(32) CHARACTER SET utf8 COLLATE utf8_general_ci NOT NULL COMMENT '密码,加密存储',
  `phone` varchar(20) CHARACTER SET utf8 COLLATE utf8_general_ci NULL DEFAULT NULL COMMENT '注册手机号',
  `email` varchar(50) CHARACTER SET utf8 COLLATE utf8_general_ci NULL DEFAULT NULL COMMENT '注册邮箱',
  `created` datetime(0) NOT NULL,
  `updated` datetime(0) NOT NULL,
  PRIMARY KEY (`id`) USING BTREE,
  UNIQUE INDEX `username`(`username`) USING BTREE,
  UNIQUE INDEX `phone`(`phone`) USING BTREE,
  UNIQUE INDEX `email`(`email`) USING BTREE
) ENGINE = InnoDB AUTO_INCREMENT = 54 CHARACTER SET = utf8 COLLATE = utf8_general_ci COMMENT = '用户表' ROW_FORMAT = Compact;
发现 mysql 主从一共六个数据库中都新增了相同的表 则mycat 配置成功

发表评论 取消回复