SSHExtTree
百度文库提供下载:http://wenku.baidu.com/view/485e4d36f111f18583d05aed.html
开标题就知道是Struts、Spring、Hibernate、ExtJS的Tree实例文档,其中包括Filter功能的checkNodeTree、comboBoxCheckNodeTree、comboBoxTree这三种扩展的tree。不错,如果你不了解Struts、Spring、Hibernate、ExtJS,也不要紧。跟着我做,做出这个例子应该木有问题。
生产环境:
System:Windows
WebBrowser:IE6+、Firefox3+
JavaEE Server:tomcat5.0.2.8、tomcat6
IDE:eclipse、MyEclipse6.1+
Database:Ms SQLServer2000、2005
开发依赖库版本:
ExtJS:lib 2.1
Struts: 2.1.4
Hibernate:3.2
Spring:2.0
Email:hoojo_@126.com
Blog:http://blog.csdn.net/IBM_hoojo
http://hoojo.cnblogs.com/
如果你具备上面的环境后,下面就可以跟着我一步步的完成这个SSHExtTree的示例。
1、 添加Hibernate支持,这里我用MyEclipse的工具直接添加jar包和链接数据库的配置文件,这一步如果你熟悉可以跳过。
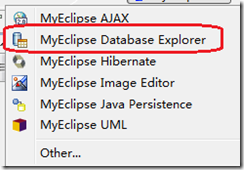
A、 首先你选择你的MyEclipse中的MyEclipse Database Explorer这个视图
B、 进入视图后,点击new

C、 进入new视图后,你就可以添加你的DB的链接数据库的种类、端口、地址、数据库名称
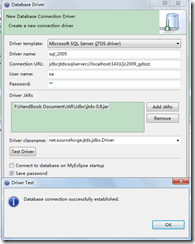
我上面选择的是MsSQL2005
Connect URL:jdbc:jtds:sqlserver://localhost:1433/jc2009_gdszz
jc2009_gdszz是数据库的名称,是建科院的数据库
用户名、密码就是你链接数据库的密码
注意的是你还要添加你的链接数据库的driver,我这里用jdts驱动
上面的完成后,你可以点击Test Driver就可以测试你的链接对不对。如果对的话就会出现上面的successfully!
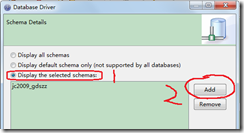
D、 继续Next你可以选择第三个单选按钮,就是下面的1。然后点击Add按钮选择你的数据库。这样后面链接数据库的时候就不会出现其他的数据库了;点击Finish
E、 下面开始链接数据库
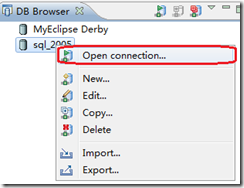
上面的sql_2005就是我们刚才建的数据库链接了。右键sql_2005,然后点击Open connection,就可以链接到你的数据库了
F、 然后展开数据库,选择dbo展开,选择table。你就看到你的数据库中的表了
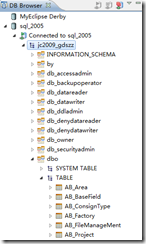
至此数据链接创建成功,下面我们添加Hibernate的支持。
G、 下面切换到MyEclipse JavaEE视图,如果你喜欢Java视图也可以。这里用MyEclipse JavaEE视图。
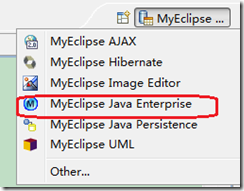
然后右键点击你建好的SSHExtTree这个WebProject

选择MyEclipse,选择Add Hibernate
H、进入添加Hibernate支持的视图后,选择Hibernate3.2;然后记得选择添加jar包到你的工程lib中
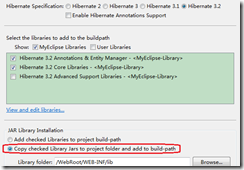
I、 继续Next,选择New。我喜欢单独的Hibernate配置文件,如果你不喜欢你可以在Spring中添加配置。

J、 点击Next,进入选择数据库链接的视图,当然是选择我们刚才创建的sql_2005这个视图了。
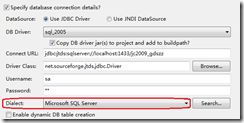
记得选择你的数据库方言,数据库方言对于不同的数据库是不同的。
K、 点击Next你就可以看到创建SessionFactory,我们用Spring就不要这个了。点击Finish;就可以看到配置文件hibernate.cfg.xml
我们还得添加2条:
<property name="format_sql">true</property>
<property name="show_sql">true</property>
这个在调试程序的时候有用,可以格式化输入sql语句
综上所述,上面的主要完成的就是添加Hibernate的jar包和数据库链接配置文件。你也可以手动添加Hibernate的数据库配置文件和jar包。那样就不需要上面的步骤。
2、 下面我们添加Spring的支持,请跟着我做
A、 右键SSHExtTree项目,选择MyEclipse然后选择Add Spring
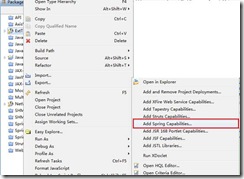
B、 点击后你可以看到Spring的支持了,Spring选择2.0的版本。然后就是选择你要的jar包。
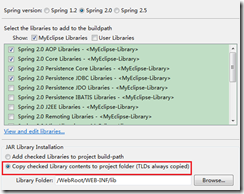
C、 我们选择完后,继续下一步Next

D、 继续下一步Next

上面的SessionFactory Bean id就是你的applicationContext.xml这个文件中的SessionFactory的bean的id。在后面我们需要为其他使用Hibernate模版的文件件注入sessionFactory。至此Spring的支持添加完毕,现在我们需要配置Spring的Aop管理我们的事务。
E、 首先修改applicationContext.xml为applicationContext-common.xml,然后我们添加aop、tx的命名空间。你也可以手动添加,如果你不记得Sping的aop、tx的命名空间,请跟着我做。
F、 右键我们的Project,选择New然后选择xml basic template
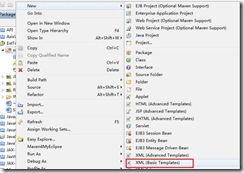
G、 进入页面后,直接next。选择第二项

H、进入后,看下面的选择schema文件

先选择aop2.0,点击next
I、 进入视图后你可以看到
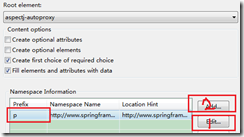
选择p,点击Edit 也就是1处。然后将改成aop。然后点击Add
J、 进入视图后,你就可以继续选择tx这个命名空间的schame
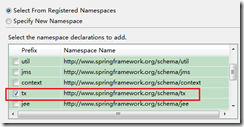
K、 点击ok后,你可以选择刚才的tx。然后点击edit。为它添加xsd
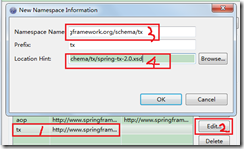
将ns name复制粘贴到Location Hint中,然后在后面添加/spring-tx-2.0.xsd
完了后,点击Finish。
然后copy里面的内容到刚才的applicationContext-common.xml中,内容如下:
xmlns:aop="http://www.springframework.org/schema/aop"
xmlns:tx="http://www.springframework.org/schema/tx"
xsi:schemaLocation="http://www.springframework.org/schema/aop
http://www.springframework.org/schema/aop/spring-aop-2.0.xsd
http://www.springframework.org/schema/tx
http://www.springframework.org/schema/tx/spring-tx-2.0.xsd ">
刚才这么多步骤就是要这些文件的内容
最后common文件的的头部就是这样的内容:

 代码<beans xmlns="http://www.springframework.org/schema/beans"
xmlns:xsi="http://www.w3.org/2001/XMLSchema-instance"
xmlns:aop="http://www.springframework.org/schema/aop"
xmlns:tx="http://www.springframework.org/schema/tx"
xsi:schemaLocation="http://www.springframework.org/schema/aop
http://www.springframework.org/schema/aop/spring-aop-2.0.xsd
http://www.springframework.org/schema/tx
http://www.springframework.org/schema/tx/spring-tx-2.0.xsd
http://www.springframework.org/schema/beans
http://www.springframework.org/schema/beans/spring-beans-2.0.xsd">
L、 下面配置事务的传播特性
Hibernate的事务管理机制

 代码<!-- 配置事务管理器,并注入sessionFactory -->
<bean name="transactionManager" class="org.springframework.orm.hibernate3.HibernateTransactionManager">
<property name="sessionFactory" ref="sessionFactory"/>
</bean>
上面的配置注入了sessionFactory,property中的name是HibernateTransactionManager中的setSessionFactory这个setter方法,后面的ref是上面的bean的引用。
事务的传播特性

 代码<!-- 配置事务的传播特性 -->
<tx:advice id="txAdvice" transaction-manager="transactionManager">
<tx:attributes>
<tx:method name="add*" propagation="REQUIRED"/>
<tx:method name="edit*" propagation="REQUIRED"/>
<tx:method name="remove*" propagation="REQUIRED"/>
<tx:method name="execute*" propagation="REQUIRED"/>
<tx:method name="*" read-only="false"/>
</tx:attributes>
</tx:advice>
配置哪些方法参与事务的管理,add*代码addXXX开头的方法,后面的propagation是事务的传播特性、级别,最后的*代表所有方法,对于查询的方法read-only只读就可以了。查询不需要参与事务。
配置在哪里启用事务,哪些包或类、方法参与事务管理:

 代码<!-- 配置哪些方法纳入事务管理 -->
<aop:config>
<aop:pointcut id="filterMethod" expression="execution(* com.hhh.biz.impl.*.*(..))"/>
<aop:advisor advice-ref="txAdvice" pointcut-ref="filterMethod"/>
</aop:config>
上面的pointcut称作切面,expression是表达式(关于表达式更多内容可以参考spring官方文档)
execution(* com.hhh.biz.impl.*.*(..))前面的execution是固定的,括号里面的内容是
第一个*代表任意返回值,com.hhh.biz.impl代表包。在这一层的包被纳入到事务的管理,impl.*代表impl下面的所有的class,impl.*.*代表class中所有方法,impl.*.*(..)代表的是方法的任意个参数。这个表达的是事务管理到com.hhh.biz.impl下所有类的方法的任意返回值、任意参数
advice-ref是上面配置的事务的传播特性,pointcut-ref是上面的切面配置至此关键的配置就完毕了。
综上所述,上面的主要是完成用IDE添加Spring的jar包和配置文件,如果你不想用上面的方式,也可以手动添加jar包。然后将xml配置文件的的头部、命名空间等信息贴到建好的xml中也是可行的。
3、 下面我们将手动添加Struts2.x的jar和配置Struts2.x的运行环境
A、 你需要添加以下jar包
commons-logging-api-1[1].1.1.jar
freemarker-2[1].3.10.jar
ognl-2[1].6.11.jar
struts2-core-2.0.11.jar
xwork-2[1].0.2.jar
由于和Spring整合,这里还有添加strtus和spring的插件包struts2-spring-plugin-2.0.14.jar
B、 下面开始配置struts的核心控制器
在web.xml中添加如下配置:

 代码<filter>
<filter-name>struts2</filter-name>
<filter-class>org.apache.struts2.dispatcher.FilterDispatcher</filter-class>
</filter>
<filter-mapping>
<filter-name>struts2</filter-name>
<url-pattern>/*</url-pattern>
</filter-mapping>
这样struts2的web.xml配置就完成了
C、 下面开始添加struts的Action配置文件,这个文件的名称就是struts.xml。不要随便更改,这个是默认的名称。如果你想用其他的名称,请在web.xml中的核心控制器中配置param参数设置配置文件的名称。
内容如下:

 代码<?xml version="1.0" encoding="UTF-8"?>
<!DOCTYPE struts PUBLIC
"-//Apache Software Foundation//DTD Struts Configuration 2.0//EN"
"http://struts.apache.org/dtds/struts-2.0.dtd">
<struts>
</struts>
这样struts的配置就完成了
4、 整合ssh框架,首先还是web.xml配置。
Spring提供了编码过滤器,我们在web.xml添加编码过滤器的配置。

 代码 <filter>
<filter-name>characterEncodingFilter</filter-name>
<filter-class>org.springframework.web.filter.CharacterEncodingFilter</filter-class>
<init-param>
<param-name>encoding</param-name>
<param-value>UTF-8</param-value>
</init-param>
</filter>
<filter-mapping>
<filter-name>characterEncodingFilter</filter-name>
<url-pattern>/*</url-pattern>
</filter-mapping>
配置加载Spring配置的路径

 代码<context-param>
<param-name>contextConfigLocation</param-name>
<param-value>classpath*:applicationContext-*.xml</param-value>
</context-param>
配置加载Spring上下文的的监听器

 代码<listener>
<listener-class>org.springframework.web.context.ContextLoaderListener</listener-class>
</listener>
至此配置基本完成,下面发布到tomcat中。看看是否有误错误,没有错误请求index.jsp看看。成功了就继续;
请求发现出现了java.lang.ClassNotFoundException: org.springframework.web.context.ContextLoaderListener这个异常信息,发现在添加jar包的时候没有把spring-web这个选中。那就手动添加spring-web.jar
这个jar包就ok了。启动发现没有错误,范围index.jsp也成功了。
5、 下面通过用MyEclipse Database Explorer生成JavaBeans、hbm.xml配置文件
我们这里写Tree,只需用一张Tree的表就可以了。
首先看下这张表的结构,代码如下:
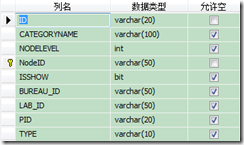
NodeId是主键,PID引用NodeID,PID是应用的父节点。也就是说当前数据的PID指向的数据的id就是它的父元素。
假如要查NodeID=1的子元素,那就差些PID=1的就是它的子元素的。
A、右键击sort表格,选择reverse
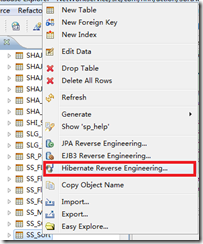
这里就选sort这个表,然后右键。选择Hibernate Reverse Engineering就可以生产JavaBeans、hbm.xml映射文件了。
B、选择Browser,选择package
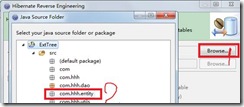
C、选择create POJO DB<->Table,然后点击Finish
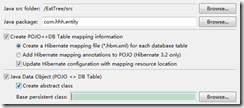
文件就生成了

6、 编写ExtJS的Tree需要的树形结构的JavaBeans和完成Tree数据查询接口和实现代码。
Tree JavaBeans

 代码public class Tree {
private String id;
private String text;//固定格式
private boolean leaf;//固定格式
private Integer nodelevel;
private String nodeId;
private String pid;
//private String uiProvider = "col";
private List<Sort> children = new ArrayList<Sort>();//固定格式
//setter/getter
public Tree(){
}
public Tree(String text, String id, String nodeId, String pid, Integer nodelevel) {
this.id = id;
this.text = text;
this.pid = pid;
this.nodeId = nodeId;
this.nodelevel = nodelevel;
if (nodelevel < 3) {
this.leaf = false;
} else {
this.leaf = true;
}
}
上面的text、leaf、children三个元素是ExtJS的Tree的固定属性。如果不按照这个格式创建JavaBeans,那么Tree将不能顺利加载。
BaseDao接口

 代码public interface BaseDao<T> {
/**
* 通过用hql完成查询
* @createDate Dec 25, 2010 6:19:22 PM
* @param hql
* @return
* @throws Exception
*/
public List<T> getList(String hql) throws Exception;
}
BaseDaoImpl上面接口的实现也很简单,就是继承HibernateDaoSupport完成查询

 代码 /**
* <b>function:</b> 通过hql语句查询List集合
* @createDate 2010-8-2 下午05:51:05
* @param hql 查询hql语句
* @return List<?>
* @throws Exception
*/
@SuppressWarnings("unchecked")
public List<T> getList(String hql) throws Exception {
List<T> list = null;
try {
list = (List<T>) this.getHibernateTemplate().find(hql);
} catch (Exception e) {
throw new RuntimeException(e);
}
return list;
}
编写TreeDao接口

 代码public interface TreeDao<T> {
public List<T> getTreeListByParentId(T entity) throws Exception;
}
TreeDaoImpl上面接口实现

 代码public class TreeDaoImpl<T extends Tree> implements TreeDao<T> {
private BaseDao<T> dao;
public void setDao(BaseDao<T> dao) {
this.dao = dao;
}
public List<T> getTreeListByParentId(T entity) throws Exception {
String hql = "select new com.hhh.entity.Tree(categoryname, id, nodeId, pid, nodelevel) from SsSort where isshow = 1";
if (entity == null || entity.getNodeId() == null || "".equals(entity.getNodeId())) {
hql += " and pid is null";
} else {
hql += " and pid = '" + entity.getNodeId() + "'";
}
return dao.getList(hql);
}
}
上面的hql查询语句是将SsSort(Ss_sort table)这个对象的查询到的数据封装在Tree这个对象中。
现在看看服务层biz接口和实现

 代码public interface TreeBiz<T extends Tree> {
/**
* 通过sort对象去查询子结点list
* @createDate 2010-8-10 下午02:51:55
* @param <T> 操作对象类型
* @param entity 查询数据封装条件
* @return 返回sort对象所有的list集合
* @throws Exception
*/
public List<T> getTreeListByParentId(T entity) throws Exception;
/**
* 通过entity对象查询子对象进行递归变量查找
* @createDate 2010-8-11 下午01:04:02
* @param <T> 查询对象类型
* @param entity 查询对象
* @throws Exception
*/
public void getTreeByParentId2Recursion(T entity) throws Exception;
}
看看实现的代码:

 代码package com.hhh.biz.impl;
import java.util.List;
import com.hhh.biz.TreeBiz;
import com.hhh.dao.TreeDao;
import com.hhh.entity.Tree;
public class TreeBizImpl<T extends Tree> implements TreeBiz<T> {
private TreeDao<T> dao;
public void setDao(TreeDao<T> dao) {
this.dao = dao;
}
public List<T> getTreeListByParentId(T entity) throws Exception {
return dao.getTreeListByParentId(entity);
}
/**
* @see com.hhh.biz.TreeBiz#getTreeByParentId2Recursion(com.hhh.entity.Tree)
* 这是一个递归查询,如果你一下看不明白递归的代码,可以参考getSortByParentId2Leaf方法
* 然后将循环中相同的代码改造成递归即可
* @createDate Dec 25, 2010 7:07:26 PM
*/
@SuppressWarnings("unchecked")
public void getTreeByParentId2Recursion(T entity) throws Exception {
List<T> child = dao.getTreeListByParentId(entity);
if (child.size() > 0) {
for (T s : child) {
this.getTreeByParentId2Recursion(s);
}
entity.setChildren((List<Tree>)child);
} else {
entity.setLeaf(true);
}
}
public void getTreeByParentId2Leaf(T entity) throws Exception {
List<T> child = dao.getTreeListByParentId(entity);
if (child.size() > 0) {
for (T s : child) {
List<T> child2 = dao.getTreeListByParentId(s);
if (child2.size() > 0) {
for (T s2 : child2) {
List<T> child3 = dao.getTreeListByParentId(s2);
if (child3.size() > 0) {
for (T s3 : child3) {
List<T> child4 = dao.getTreeListByParentId(s3);
if (child4.size() == 0) {
s3.setLeaf(true);
} else {
s3.setLeaf(false);
}
s2.getChildren().add(s3);
}
} else {
s2.setLeaf(true);
}
s.getChildren().add(s2);
}
} else {
s.setLeaf(true);
}
entity.getChildren().add(s);
}
} else {
entity.setLeaf(true);
}
}
}
上的查询getTreeByParentId2Recursion用到了递归方法,如果你对递归的代码不是很明白就看看下面的查询getTreeByParentId2Leaf代码
7、 下面编写Action代码,action中需要用到json-lib这个jar包,这个jar的主要作用就是将Java对象序列化成json格式的字符串对象。
需要添加如下jar包:
ezmorph-1.0.3.jar
json-lib-2.3-jdk15.jar
commons-lang.jar
commons-collections-3.2.jar
commons-beanutils.jar

 代码public class TreeAction extends ActionSupport {
private static final long serialVersionUID = -3795544890686836966L;
private TreeBiz<Tree> biz;
private String data;
private Tree tree = new Tree();
public void setBiz(TreeBiz<Tree> biz) {
this.biz = biz;
}
@Override
public String execute() throws Exception {
biz.getTreeByParentId2Recursion(tree);
data = JSONArray.fromObject(tree.getChildren()).toString();
return SUCCESS;
}
}
上面的代码很简单,看看action中的execute代码。JSONArray.fromObject这个主要就是将一个数值序列化成json的字符串。
看看xml配置文件的配置:

 代码<struts>
<constant name="struts.i18n.encoding" value="UTF-8"/>
<package name="SSHExtTree" extends="struts-default">
<action name="tree" class="treeAction">
<result>/data.jsp</result>
</action>
</package>
</struts>
首先看看struts配置文件中的constant元素,它是设置struts的国际化编码的,然后就是package这个包,它相当于Java类在package是区分配置的空间,其实package还有一个属性就是namespace命名空间。后面的extends是继承struts-default的默认配置。
action就是配置的class Action的配置,上面的Action就通过这里的配置。name就是我们访问action的路径,class就是Action的classpath。这里用了spring的继承,所有class和spring配置的bean的id或name对应的。result是Action跳转的视图配置。
Spring的beans的配置:

 代码<beans xmlns="http://www.springframework.org/schema/beans"
xmlns:xsi="http://www.w3.org/2001/XMLSchema-instance"
xsi:schemaLocation="http://www.springframework.org/schema/beans
http://www.springframework.org/schema/beans/spring-beans-2.0.xsd">
<bean id="baseDao" class="com.hhh.dao.impl.BaseDaoImpl">
<property name="sessionFactory" ref="sessionFactory"/>
</bean>
<bean id="treeDao" class="com.hhh.dao.impl.TreeDaoImpl">
<property name="dao" ref="baseDao"/>
</bean>
<bean id="treeBiz" class="com.hhh.biz.impl.TreeBizImpl">
<property name="dao" ref="treeDao"/>
</bean>
</beans>
Spring的action的配置:

 代码<beans xmlns="http://www.springframework.org/schema/beans"
xmlns:xsi="http://www.w3.org/2001/XMLSchema-instance"
xsi:schemaLocation="http://www.springframework.org/schema/beans
http://www.springframework.org/schema/beans/spring-beans-2.0.xsd">
<bean id="treeAction" class="com.hhh.action.TreeAction">
<property name="biz" ref="treeBiz"/>
</bean>
</beans>
这里是id=treeAction就是和上面struts配置文件中的action配置的class对应的。
这里这样配置能够起作用是struts2-spring-plugin-2.0.14.jar这个jar包
8、 发布启动当前工程发现有如下错误:
org.hibernate.MappingException: Association references unmapped class: com.hhh.entity.SsSortSubject
我们删掉SsSort.hbm.xml这个配置文件中的
<set name="ssSortSubjects" inverse="true">
<key>
<column name="Sort_ID" length="50" not-null="true" />
</key>
<one-to-many class="com.hhh.entity.SsSortSubject" />
</set>
我们不需要这个配置
如果出现这个java.lang.NoClassDefFoundError: org/objectweb/asm/CodeVisitor异常就删掉cglib这个jar包,这是cglib中需要asm这个依赖。这里我们不要cglib。
如果发布成功,启动没有错误。然后在浏览器中输入:http://localhost:8080/ExtTree/tree.action
看看是否输出json格式的字符串。如果输出是正常的内容,没有异常。那么后台的代码就编写成功。
9、 下面开始编写客户端的代码,添加ext2的js库。
编写客户端tree的代码:

 代码Ext.namespace("Ext.hhh");
/*+++++++++++++++++++++++++++++++++++++++++++++++++++++++++++++++
+ 系统项目树 +
+ create date: 2010-12-26 +
+++++++++++++++++++++++++++++++++++++++++++++++++++++++++++++++*/
Ext.hhh.SystemTree = Ext.extend(Ext.tree.TreePanel, {
constructor: function () {
this.hiddenPkgs = [];
Ext.hhh.SystemTree.superclass.constructor.call(this, {
title: "项目菜单",
//xtype: "treepanel",
//singleExpand: true, //只展开一个子结点,展开另一个就隐藏其他
renderTo: Ext.fly("showTree"),
iframe: true,
height: 600,
width: 300,
lines: false,
useArrows: false,
autoScroll: true,
rootVisible: false,
maskDisabled: false,
checkModel: "multiple",
onlyLeafCheckable: false,
loader: new Ext.tree.TreeLoader({
dataUrl: Ext.hhh.SystemTree.TREE_DATA_URL,
baseAttrs: {
uiProvider: Ext.ux.TreeCheckNodeUI //添加 uiProvider 属性
},
clearOnLoad: false
/*baseParams: {
"sort.nodeId": "100"
},*/
/*uiProviders: {
"col": Ext.ux.TreeCheckNodeUI //需要在后台传递数据的时候,需要添加一个uiProviders属性,值为col;
}*/
}),
root: new Ext.tree.AsyncTreeNode({
expanded: true,
text: "系统项目",
id: "100"
}),
listeners: {
click: function(node) {
//Ext.Msg.alert("Navigation Tree Click", "You clicked: " + node.attributes.nodeId + "," + node.text + ",");
window.frames["content"].document.body.innerHTML = "name:" + node.text + ", nodeId:" + node.attributes.nodeId;
},
check: function(node, checked){
//alert(node.text+" = "+ checked);//注册"check"事件
window.frames["content"].document.body.innerHTML = "name:" + node.text + ", nodeId:" + node.attributes.nodeId;
}
}
}
});
上面就是一颗树,带点击和选中事件的tree。我们还可以给它额外添加些辅助功能,让它可以查询树节点,点击展开、收缩、刷新等功能。
首先添加这些工具条,toolbar

 代码tbar: [" ", {
xtype: "textfield",
enableKeyEvents: true,//启用键盘事件,默认是不开启的
emptyText: "请输入查询内容",
width: 205
}, {
tooltip: "展开所有",
iconCls: "expandIcon",
handler: this.onExpendAllNode,
scope: this//设置scope后,this指向MainViewport,不设置默认指向当前对象
}, "-", {
tooltip: "收缩所有",
iconCls: "collaspeIcon",
handler: this.onCollspseAllNode,
scope: this
}, "-", {
tooltip: "刷新",
iconCls: "refreshTree",
handler: this.onRefreshHandler,
scope: this
}]
完善工具条上面的handler事件的方法

 代码onExpendAllNode: function () {
this.onNodeExpandAll();
},
onCollspseAllNode: function () {
this.onNodeCollapseAll();
},
onRefreshHandler: function () {
this.onRefreshSystemTree();
},
onNodeExpandAll: function () {
this.body.mask('Loading...', 'x-mask-loading');
var t = this;
this.root.expand(true, true, function () {
(function () {
t.body.unmask();
}).defer(200);
});
},
onNodeCollapseAll: function () {
this.root.collapse(true);
},
onRefreshSystemTree: function () {
this.body.mask('Loading...', 'x-mask-loading');
var tb = this.body;
var t = this;
this.onNodeCollapseAll();
this.root.reload(function () {
tb.unmask();
t.root.expand(true);
});
/*this.root.reload();
setTimeout(function () {
tb.unmask();
t.onNodeExpandAll();
}, 1000);*/
}
看看tree的入口函数和导入的js文件

 代码<%@ page language="java" import="java.util.*" pageEncoding="UTF-8"%>
<%
String path = request.getContextPath();
String basePath = request.getScheme()+"://"+request.getServerName()+":"+request.getServerPort()+path+"/";
%>
<!DOCTYPE HTML PUBLIC "-//W3C//DTD HTML 4.01 Transitional//EN">
<html>
<head>
<base href="<%=basePath%>">
<title>My JSP 'index.jsp' starting page</title>
<meta http-equiv="pragma" content="no-cache">
<meta http-equiv="cache-control" content="no-cache">
<meta http-equiv="expires" content="0">
<meta http-equiv="keywords" content="keyword1,keyword2,keyword3">
<meta http-equiv="description" content="This is my page">
<link rel="stylesheet" type="text/css" href="ext2/resources/css/ext-all.css" />
<link rel="stylesheet" type="text/css" href="ext2/resources/css/xtheme-gray.css" />
<%--
<link rel="stylesheet" type="text/css" href="ext2/resources/css/xtheme-slate.css" />
--%>
<script type="text/javascript" src="ext2/adapter/ext/ext-base.js"></script>
<script type="text/javascript" src="ext2/ext-all.js"></script>
<script type="text/javascript" src="ext2/build/locale/ext-lang-zh_CN-min.js"></script>
<!-- tree带checkbox的插件 -->
<script type="text/javascript" src="jslib/Ext.ux.TreeCheckNodeUI.js"></script>
<script type="text/javascript" src="jslib/Ext.hhh.SystemTree.js"></script>
<link rel="stylesheet" type="text/css" href="style/system.css"/>
<script type="text/javascript">
Ext.onReady(function () {
Ext.BLANK_IMAGE_URL = "ext2/resources/images/default/s.gif";
Ext.QuickTips.init();
Ext.form.Field.prototype.msgTarget = "side";
new Ext.hhh.SystemTree();
});
</script>
</head>
<body>
<div id="showTree" style="float: left;"></div>
<iframe name="content" style="float: left; width: 75%; height: 100%;"></iframe>
</body>
</html>
启动项目,在浏览器中请求:
http://localhost:8080/SSHExtTree/index.jsp
可以看到如下界面:
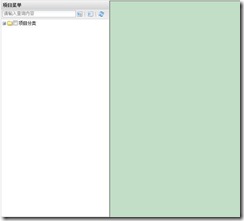
在查询的地方输入检测,就可以查询到相关带检测的项目:
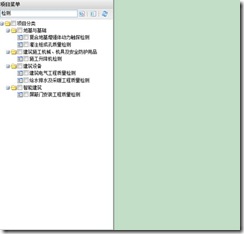
点击一个节点就可以得到它的id或text

下拉列表选择节点树
效果图:

有了上面写的tree,现在写comboboxCheckNodeTree。需要用到扩展的comboBox的js文件。Ext.ux.ComboBoxCheckTree.js这个是插件,进扩展的comboBox的js库。直接引入即可。下面编写comboBox的js:

 代码/**
* @function 选择树节点combobox
* @createDate: Sep 5, 2010 3:22:35 PM
* @class Ext.hoo.tree.ComboBoxCheckNodeTree
* @extends Ext.ux.ComboBoxCheckTree
*/
Ext.ns("Ext.hoo.tree");
Ext.hoo.tree.ComboBoxCheckNodeTree = Ext.extend(Ext.ux.ComboBoxCheckTree, {
constructor: function () {
Ext.hoo.tree.ComboBoxCheckNodeTree.superclass.constructor.call(this, {
renderTo: Ext.get('show'),
//width: 300,
height: 150,
// define which node's value will be submited
//all 所有节点
//folder 父节点
//leaf 叶子节点
//selectValueModel: 'leaf', 默认叶子节点
tree: {
xtype: 'treepanel',
height: 100,
checkModel: 'cascade', //cascade 级联选择模式
onlyLeafCheckable: false,//可以选择所有的节点,true叶子
animate: true,
rootVisible: true,
autoScroll: true,
loader: new Ext.tree.TreeLoader({
dataUrl: Ext.hoo.tree.ComboBoxCheckNodeTree.TREE_DATA_URL,
baseAttrs: {
uiProvider: Ext.ux.TreeCheckNodeUI//Ext.tree.TreeNodeUI
}
}),
root: new Ext.tree.AsyncTreeNode({
expanded: true,
text: "系统项目",
id: "100"
})
}
});
//this.on("change", this.onFieldChange, this);
this.on("blur", this.onFieldChange, this);
},
onFieldChange: function (field) {
alert(field.getValue() + "###" + this.getValue() + "#######" + this.getRawValue());
}
});
Ext.hoo.tree.ComboBoxCheckNodeTree.TREE_DATA_URL = "tree.action";
Ext.onReady(function () {
Ext.BLANK_IMAGE_URL = "ext2/resources/images/default/s.gif";
new Ext.hoo.tree.ComboBoxCheckNodeTree();
});
代码比较简单,上面常用的属性也作注释说明。这个comboBoxTree可以用作多选比较好,当然单选也可以。
下拉列表树
效果图:
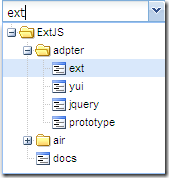
不带checkbox的tree,一般用于单选模式。看代码:

 代码/**
* @function 带checkbox的tree的combobox
* @createDate: Sep 5, 2010 3:22:35 PM
* @class Ext.hoo.tree.ComboBoTree
* @extends Ext.ux.ComboBoxCheckTree
*/
Ext.ns("Ext.hoo.tree");
Ext.hoo.tree.ComboBoTree = Ext.extend(Ext.ux.ComboBoxTree, {
constructor: function () {
Ext.hoo.tree.ComboBoTree.superclass.constructor.call(this, {
renderTo: Ext.get('basicTree'),
//width: 300,
height: 150,
//all:所有结点都可选中
//exceptRoot:除根结点,其它结点都可选(默认)
//folder:只有目录(非叶子和非根结点)可选
//leaf:只有叶子结点可选
selectNodeModel: "leaf",
//hiddenId: "comboHideId",
hiddenName: "comboHideName",
tree: {
xtype: 'treepanel',
height: 100,
animate: true,
rootVisible: true,
autoScroll: true,
loader: new Ext.tree.TreeLoader({
dataUrl: Ext.hoo.tree.ComboBoTree.TREE_DATA_URL
}),
root: new Ext.tree.AsyncTreeNode({
expanded: true,
text: "系统项目",
id: "100"
})
},
listeners: {
select: function (field) {
alert(field.getValue() + "###" + this.getValue() + "#######" + this.getRawValue() + "###" + this.getNode().text);
}
}
});
}
});
Ext.hoo.tree.ComboBoTree.TREE_DATA_URL = "tree.action";
Ext.onReady(function () {
Ext.BLANK_IMAGE_URL = "ext2/resources/images/default/s.gif";
new Ext.hoo.tree.ComboBoTree();
});
代码
代码
代码
代码
代码
代码
代码
代码
代码
代码
代码
代码
代码
代码
代码
代码
代码
代码
代码
代码
代码
代码
代码
代码
代码
代码


发表评论 取消回复