创建项目
使用Xamarin开发安卓项目,首先需要安装VS2017以上版本。因为VS2017以上的版本,可以直接创建Xamarin项目。
另外用Xamarin开发安卓项目,还需要使用Intel的CPU,并且得是双核以上的CPU,因为调试时,需要使用电脑的虚拟化,奔腾4之类的CPU是不支持虚拟化的。
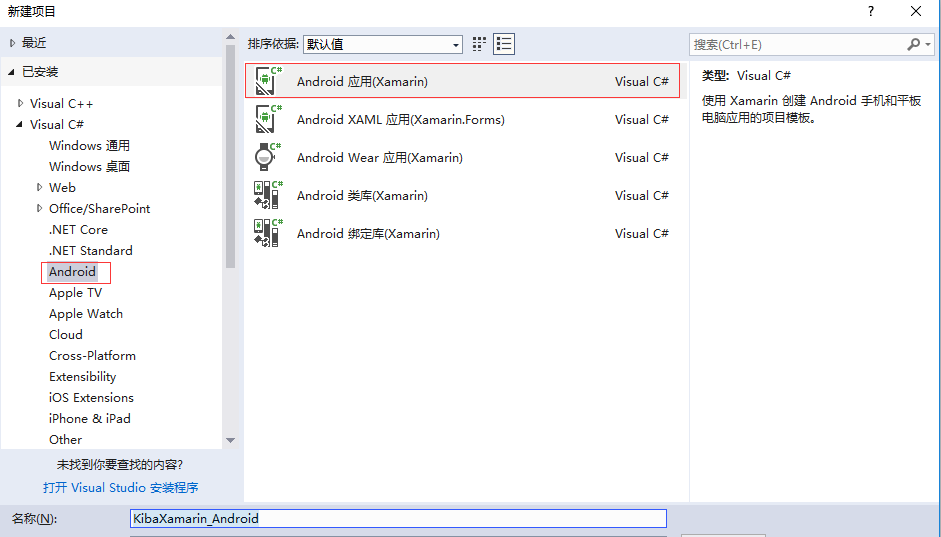
下面我们创建KibaXamarin_Android项目,如下图:
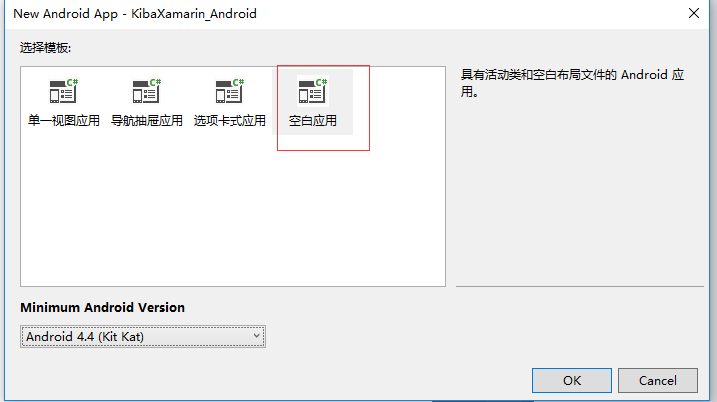
点击确定后,会弹出一个选择模板的窗体,这里我们选择一个空白应用,并且选择最小安卓版本号为4.4,如下图:
点击OK后,项目创建完成,解决方案内容如下图
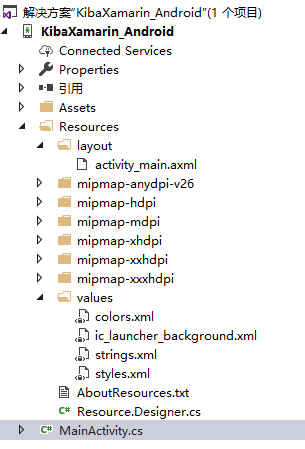
解决方案中重要的文件及文件夹如下:
Resources/layout/activity_main.axml:该文件为主页面。
MainActivity.cs:该文件为主页面对应的后台页面,也我们进行逻辑操作或者调用逻辑操作的地方。
Resources/value/xxx.xml:value文件夹下主要存储常用的值,类似于我们C#中的const常量。
其他文件夹及文件暂时忽略。
在Resources文件夹里,我们可以发现,没有存储图片的地方,那么,我们创建一个文件夹drawable用来存储图片。
为什么用drawable存图片?答案很简单,因为网上的开源样式里的图片大多放在了drawable里,建立一个这样的文件夹,绝对会减少我们的工作量。
接下来,我们看一下我们的核心文件,MainActivity,代码如下:
1 2 3 4 5 6 7 8 9 10 | [Activity(Label = "@string/app_name", Theme = "@style/AppTheme", MainLauncher = true)]public class MainActivity : AppCompatActivity{ protected override void OnCreate(Bundle savedInstanceState) { base.OnCreate(savedInstanceState); // Set our view from the "main" layout resource SetContentView(Resource.Layout.activity_main); }} |
首先,我们看第一行的特性,这里有三个属性赋值,含义如下:
Label:页面的标题。
Theme:页面的样式。
MainLauncher:是否是主窗体,该属性在项目只能给一个页面。
然后,我们可以看到我们的主页面MainActivity继承了AppCompatActivity,这里的AppCompatActivity是一个继承了Activity的子类,我们暂时先不了解它,因为我们即将创建一个继承Activity的BaseActivity,后续的[Activity]也将继承BaseActivity。
接下来我们看到了OnCreate方法,这里我们需要了解下Activity的生命周期,OnCreate是Activity的第一个触发的方法,可以暂时先理解为Activity的构造函数。
OnCreate方法里我们看到了SetContentView(Resource.Layout.activity_main),根据字面我们先简单的理解该方法为设置内容视图。
可以看到我们在设置内容视图的时候,去资源里找了一个页面;也就是说,在Android中,视图是倒装的,现有Activity然后由Activity来控制要导入那个页面视图显示。
为了更好的寻找视图,我们将视图名和活动名进行统一,修改页面的名为MainActivity,然后再重新设置内容视图。(这里有个编译器的BUG,我们改名以后,编译器并没有同步,所以我们需要清理一下,再重新生成,如果还不成功,就删除obj文件夹,再重新生成)
BaseActivity
通过上面的描述,我们初步了解了Xamarin的Android项目。
现在我们一起创建一个BaseActivity。
首先我们需要为BaseActivity封装一些提示信息的方法,让继承该类的活动可以更简单的调用提示。
然后我们封装寻找资源的方法;在Android项目里是由活动调用视图,即先有活动后有视图,所以在活动里找页面的控件也是倒装的,那么这个寻找控件的方法就相对代码会比较多,所以我们简单封装一下。
接下来我们在封装一些跳转活动、创建服务、异步调用等基础方法;BaseActivity代码如下:
1 2 3 4 5 6 7 8 9 10 11 12 13 14 15 16 17 18 19 20 21 22 23 24 25 26 27 28 29 30 31 32 33 34 35 36 37 38 39 40 41 42 43 44 45 46 47 48 49 50 51 52 53 54 55 56 57 58 59 60 61 62 63 64 65 66 67 68 69 70 71 72 73 74 75 76 77 78 79 80 81 82 83 84 85 86 87 88 89 90 91 92 93 94 95 96 97 98 99 100 101 102 103 104 105 106 107 108 109 110 111 112 113 114 115 116 117 118 119 120 121 122 123 124 125 126 127 128 129 130 131 132 133 134 135 136 137 138 139 140 141 142 143 144 145 146 147 148 149 150 151 152 153 154 155 156 157 158 159 160 161 162 163 164 165 166 167 168 169 170 171 | [Activity(Label = "KibaXamarin_Android")]public class BaseActivity : Activity{ public void ShowActivity<T>() where T : Activity { Intent intent = new Intent(this, typeof(T)); StartActivity(intent); } public void OpenService<T>() where T : Service { Intent intent = new Intent(this, typeof(T)); StartService(intent); } #region 各种提示信息 public void ShowToast(string msg) { Toast.MakeText(this, msg, ToastLength.Short).Show(); } private AlertDialog dialog; public AlertDialog InitDialog(string msg, Action<AlertDialog> comfirmCallback, Action<AlertDialog> cancelCallback) { AlertDialog cdialog; //构造器 AlertDialog.Builder builder = new AlertDialog.Builder(this); //标题 builder.SetTitle("提示"); //图标 //builder.SetIcon(android.R.drawable.btn_dialog); //内容 builder.SetMessage(msg); //setPositiveButton(表示按钮的文本,表示单击按钮触发单击事件) builder.SetPositiveButton("OK", new EventHandler<DialogClickEventArgs>((s, e) => { if (comfirmCallback != null) { comfirmCallback(dialog); } })); builder.SetNegativeButton("Cancel", new EventHandler<DialogClickEventArgs>((s, e) => { if (cancelCallback != null) { cancelCallback(dialog); } })); //builder.SetNeutralButton("稍后提醒", new EventHandler<DialogClickEventArgs>((s, e) => { })); cdialog = builder.Create();//构建dialog对象 return cdialog; } public void ShowAlert(string msg, Action<AlertDialog> comfirmCallback = null, Action<AlertDialog> cancelCallback = null) { if (comfirmCallback == null) { cancelCallback = (d) => { dialog.Dismiss(); }; } if (cancelCallback == null) { cancelCallback = (d) => { dialog.Dismiss(); }; } dialog = InitDialog(msg, comfirmCallback, cancelCallback); if (dialog != null && !dialog.IsShowing) { dialog.Show(); } } public void NotifyMessage(string message, string title = "消息") { NotificationManager manager = (NotificationManager)GetSystemService(Context.NotificationService); // 在Android进行通知处理,首先需要重系统哪里获得通知管理器NotificationManager,它是一个系统Service。 PendingIntent pendingIntent = PendingIntent.GetActivity(this, 0, new Intent(this, typeof(MainActivity)), 0); Notification notify1 = new Notification(); notify1.Icon = Resource.Drawable.logo; notify1.TickerText = JaveString("您有新短消息,请注意查收!"); notify1.When = DateTime.Now.ToFileTime(); notify1.SetLatestEventInfo(this, title, message, pendingIntent); notify1.Number = 1; notify1.Flags |= NotificationFlags.AutoCancel; // FLAG_AUTO_CANCEL表明当通知被用户点击时,通知将被清除。 // 通过通知管理器来发起通知。如果id不同,则每click,在statu那里增加一个提示 manager.Notify(1, notify1); } public static Java.Lang.String JaveString(string str) { return new Java.Lang.String("您有新短消息,请注意查收!"); } #endregion #region 寻找资源 public T FindControl<T>(string name) where T : View { return FindViewById<T>(GetCode(name)); } public T FindControl<T>(string name, Action callBack) where T : View { View view = FindViewById<T>(GetCode(name)); view.Click += (s, e) => { callBack(); }; return FindViewById<T>(GetCode(name)); } public int GetCode(string name) { var R = this.Resources; var code = (typeof(Resource.Id)).GetFields().FirstOrDefault(f => f.Name == name).GetValue(R); return (int)code; } #endregion #region 异步调用 public void AsyncLoad(Action action) { IAsyncResult result = action.BeginInvoke((iar) => { }, null); } public void AsyncLoad(Action action, Action callback) { IAsyncResult result = action.BeginInvoke((iar) => { this.RunOnUiThread(callback); }, null); } public void AsyncLoad<T>(Action<T> action, T para, Action callback) { IAsyncResult result = action.BeginInvoke(para, (iar) => { this.RunOnUiThread(callback); }, null); } public void RunOnUi(Action action) { ((BaseActivity)this).RunOnUiThread(() => { action(); });//回UI线程 } #endregion #region 获取数据 public void GetRest(string url, Action<JsonValue> callback) { Task.Run(() => { try { HttpWebRequest request = (HttpWebRequest)HttpWebRequest.Create(new Uri(url)); request.ContentType = "application/json"; request.Method = "GET"; using (WebResponse response = request.GetResponse()) { using (Stream stream = response.GetResponseStream()) { JsonValue jsonDoc = JsonObject.Load(stream); callback(jsonDoc); } } } catch (Exception ex) { Log.Debug("BaseActivity", $"Exception at GetRest" + ex.Message); } }); } #endregion } |
视图MainActivity.axml
Android视图是有xml语法来编写的,其中一些语法定义是很奇葩,但也只能去适应,没有别的办法。比如Android里定义ID名是这样的:android:id="@+id/btn_search"。我每次看这个@+id都感觉很奇葩,哈哈。
Xamarin的视图和Android的视图是一样的,所以我们尽可上网找一些资源来使用。
我们先修改视图代码如下:
1 2 3 4 5 6 7 8 9 10 11 12 13 14 15 16 17 18 19 20 21 22 23 24 25 26 27 28 29 30 31 32 33 34 35 36 37 38 39 40 41 42 43 44 45 46 47 48 49 50 51 52 53 54 55 56 57 58 59 60 61 62 63 64 65 66 67 68 69 70 71 72 73 74 75 76 77 78 | <?xml version="1.0" encoding="utf-8"?><LinearLayout xmlns:android="http://schemas.android.com/apk/res/android" android:orientation="vertical" android:layout_width="fill_parent" android:layout_height="fill_parent" android:background="#ffffffff"> <LinearLayout android:layout_width="fill_parent" android:layout_height="wrap_content" android:background="@drawable/title_background" android:paddingLeft="5dip" android:paddingRight="5dip" android:paddingTop="5dip" android:paddingBottom="5dip" android:gravity="center_vertical"> <LinearLayout android:orientation="horizontal" android:layout_width="match_parent" android:layout_height="wrap_content" android:layout_weight="2"> <TextView android:textAppearance="?android:textAppearanceMedium" android:layout_gravity="center_vertical" android:layout_width="wrap_content" android:layout_height="wrap_content" android:text="KibaXamarin_Android" android:textColor="#ffffffff" /> <ImageView android:src="@drawable/ic_arrow_down" android:layout_gravity="center_vertical" android:layout_width="wrap_content" android:layout_height="wrap_content" android:textColor="#ffffffff" /> </LinearLayout> <FrameLayout android:layout_width="match_parent" android:layout_height="wrap_content" android:layout_weight="5"> <ImageButton android:src="@drawable/toolbar_upload_photo_normal" android:layout_gravity="right|center_vertical" android:layout_width="wrap_content" android:layout_height="wrap_content" android:background="@drawable/btn_weight" /> </FrameLayout> </LinearLayout> <LinearLayout android:gravity="center" android:orientation="horizontal" android:background="@drawable/search_bar_background" android:padding="6.0dip" android:layout_width="fill_parent" android:layout_height="wrap_content"> <Button android:textAppearance="?android:textAppearanceMedium" android:gravity="left|center" android:id="@+id/btn_search" android:layout_width="0.0dip" android:layout_height="wrap_content" android:hint="\u0020Click Me" android:drawableLeft="@drawable/ic_btn_search" android:layout_weight="1.0" /> </LinearLayout> <GridView android:paddingTop="20dip" android:gravity="center" android:id="@+id/my_grid" android:layout_width="fill_parent" android:layout_height="0.0px" android:layout_marginTop="0.0dip" android:horizontalSpacing="10.0dip" android:verticalSpacing="20.0dip" android:stretchMode="columnWidth" android:columnWidth="60.0dip" android:numColumns="3" android:layout_weight="1.0" style="@style/CustomGridView" /></LinearLayout> |
Xamarin的简单应用
现在,我们的页面和BaseActivity已经完成,让我们一起做一些简单的使用把。
1 2 3 4 5 6 7 8 9 10 | protected override void OnCreate(Bundle savedInstanceState){ base.OnCreate(savedInstanceState); SetContentView(Resource.Layout.MainActivity); Button btn_search = this.FindControl<Button>("btn_search"); btn_search.Click += (s, e) => { this.ShowToast("Click Me"); }; } |
如上代码所示,我们找到了Button-btn_search,并为他创建了单击事件;看起来还不错,代码还算简洁。
因为BaseActivity里寻找控件的方法里,还封装了Click方法,所以我们还可以这样使用:
1 | Button btn_search = this.FindControl<Button>("btn_search", () => { this.ShowToast("Click Me"); }); |
Xamarin的调试
Xamarin的调试非常简单,只要配置好模拟器按F5调试就可以了,因为VS2017集成了Emulator模拟器,所以我们只要运行调试,就会自动帮我们启动模拟器。
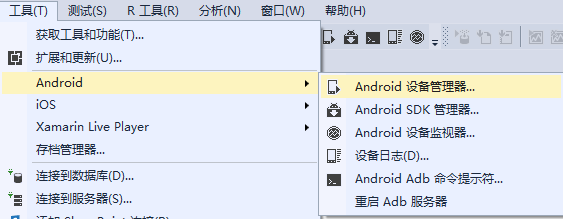
模拟器是配置很简单,在工具里找到Android—Android设备管理器,如下图:
然后做一些简单配置修改,如下图:
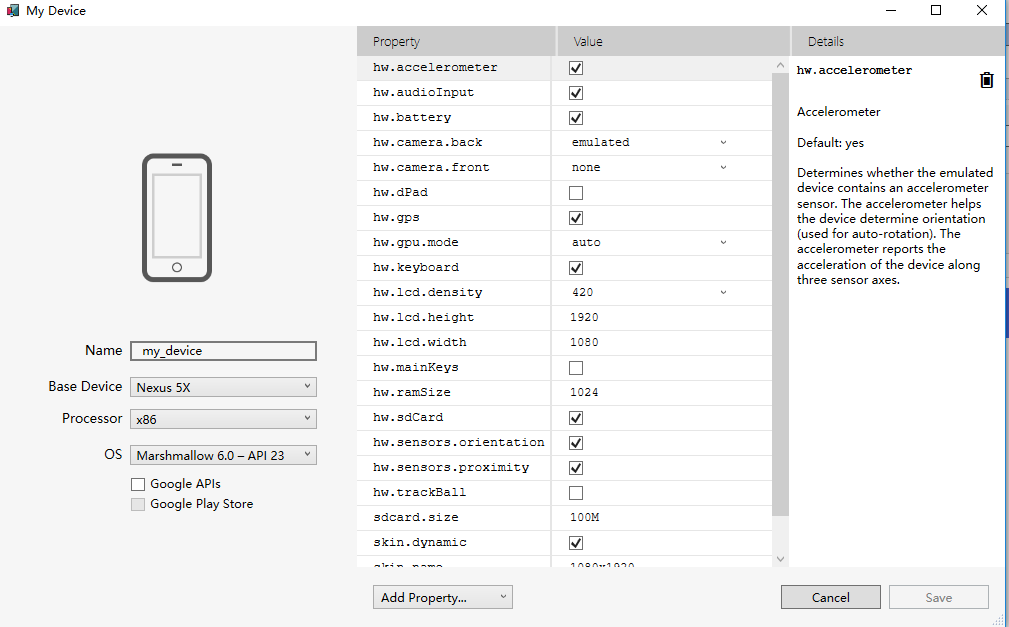
模拟器配置好以后,在调试启动的选项中,就会增加这个模拟器的选项,如下图:

接下来就很简单了,只要直接点击运行就可以了。
运行结果如下图:
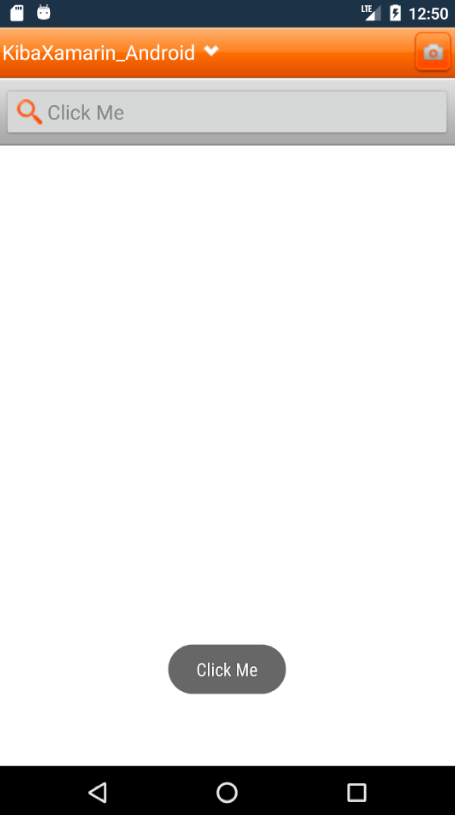
从图中我们可以看到,我们的安装项目已经成功运行了,并且执行了点击事件。
到此,这个简单的安卓项目已经创建完成了,下一篇文章,将介绍Xamarin中如何使用安卓控件。
----------------------------------------------------------------------------------------------------
代码已经传到Github上了,欢迎大家下载。
Github地址:https://github.com/kiba518/KibaXamarin_Android
----------------------------------------------------------------------------------------------------
注:此文章为原创,任何形式的转载都请联系作者获得授权并注明出处!
若您觉得这篇文章还不错,请点击下方的【推荐】,非常感谢!

发表评论 取消回复